Every successful event in San Antonio relies on guest engagement, and nothing draws a crowd quite like a well-designed photo booth zone. Wedding planners and corporate event organizers quickly discover that careful planning of booth placement, setup, and equipment determines whether guests leave with unforgettable memories or missed moments. This step-by-step guide offers actionable insights on maximizing photo booth impact, from strategic floor plans to creative software solutions tailored for standout San Antonio celebrations.
Table of Contents
- Step 1: Plan Event Space And Booth Location
- Step 2: Gather Essential Equipment And Accessories
- Step 3: Assemble And Secure Photo Booth Components
- Step 4: Configure Software And Customize Experience
- Step 5: Test Functionality And Ensure Guest Readiness
Quick Summary
| Key Point | Explanation |
|---|---|
| 1. Choose strategic booth location | Locate the photo booth near main event areas for easy access while allowing space for guest interaction. |
| 2. Invest in essential equipment | High-quality cameras, printers, and lighting enhance photo quality and guest experience at events. |
| 3. Assemble components securely | Proper assembly ensures stability and professional appearance, preventing malfunctions during the event. |
| 4. Customize software for engagement | Personalize the user interface and integrate fun features for a memorable experience tailored to the event. |
| 5. Conduct thorough pre-event testing | Testing equipment and configurations beforehand minimizes technical disruptions, ensuring a smooth guest experience. |
Step 1: Plan event space and booth location
Designing an effective floor plan for your event photo booth requires strategic spatial thinking and meticulous planning. Your goal is to create a setup that maximizes guest interaction while maintaining smooth traffic flow and ensuring the booth becomes a central attraction without disrupting other event activities.
When selecting the ideal location, consider these critical factors for optimal photo booth placement:
- Proximity to main event areas: Position the booth where guests can easily access it without interrupting key event zones
- Sufficient surrounding space: Allow room for lines, prop storage, and multiple guests waiting to take photos
- Good lighting conditions: Select an area with natural or complementary lighting that enhances photo quality
- Electrical access: Ensure nearby power outlets for equipment setup
Professional event planners understand that strategic floor plan design significantly impacts guest experience. Aim to create a dedicated photo booth zone that feels both accessible and slightly separate from the main event space, allowing guests to enjoy capturing memories without feeling crowded.
A perfectly placed photo booth becomes an interactive centerpiece that naturally draws guests and creates memorable moments.
Typically, you’ll want to allocate approximately 8-10 square feet for the booth itself, with an additional 20-30 square feet for guest queuing and movement. This ensures comfortable interaction and prevents bottlenecks during peak photo-taking times.
Here’s a quick reference for allocating event photo booth space based on guest count:
| Guest Count | Booth Space Needed | Queue & Movement Area | Total Recommended Space |
|---|---|---|---|
| Up to 50 guests | 8 sq ft | 20 sq ft | 28 sq ft |
| 50-100 guests | 9 sq ft | 25 sq ft | 34 sq ft |
| 100+ guests | 10 sq ft | 30 sq ft | 40 sq ft |
Pro tip: Conduct a quick walkthrough of your venue beforehand and use painter’s tape to mark potential booth locations, helping you visually assess the best possible placement.
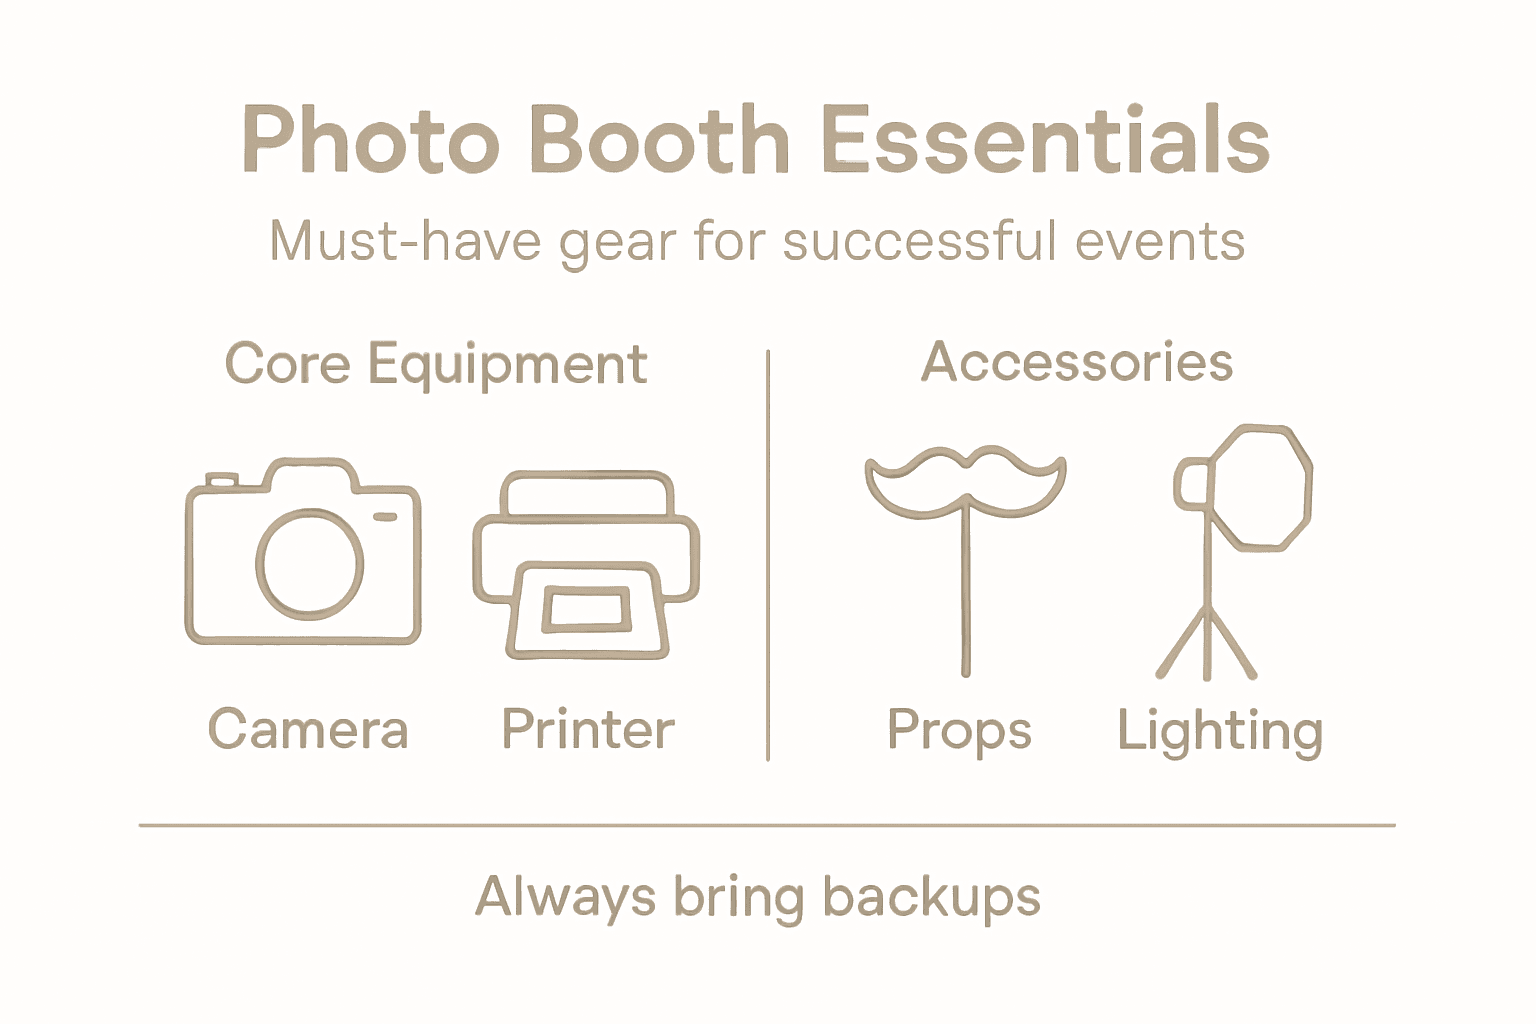
Step 2: Gather essential equipment and accessories
Building a professional photo booth requires careful selection of equipment that ensures high-quality images and smooth guest experiences. Your goal is to assemble a comprehensive kit that combines technical reliability with creative potential, transforming an ordinary setup into an extraordinary memory-making station.
When selecting photo booth equipment for beginners, focus on these critical components:
- Camera: High-resolution digital camera with reliable auto-focus capabilities
- Printer: Professional-grade photo printer capable of quick, high-quality prints
- Computer or Tablet: User-friendly interface device for guest interactions
- Lighting: Professional lighting setup to ensure consistent image quality
- Backdrop: Versatile backdrop system supporting multiple event themes
- Accessories: Props, stands, and additional decorative elements
Professional photo booth equipment is an investment in creating unforgettable event memories.
Budget considerations are important. Start with essential, reliable equipment and plan for potential upgrades as your photo booth business grows. Quality consumables like photo paper, ink cartridges, and backup memory cards are equally crucial for seamless operation.
This summary clarifies photo booth equipment impact on user experience:
| Component | Enhances | Potential Issue if Missing |
|---|---|---|
| Camera | Image clarity | Blurry or poor-quality photos |
| Printer | Instant prints | Delays and guest dissatisfaction |
| Lighting | Consistent results | Dark or washed-out pictures |
| Accessories | Fun & engagement | Generic or forgettable experience |
Pro tip: Always carry backup batteries, extra memory cards, and a compact toolkit to quickly resolve any technical issues during your event.
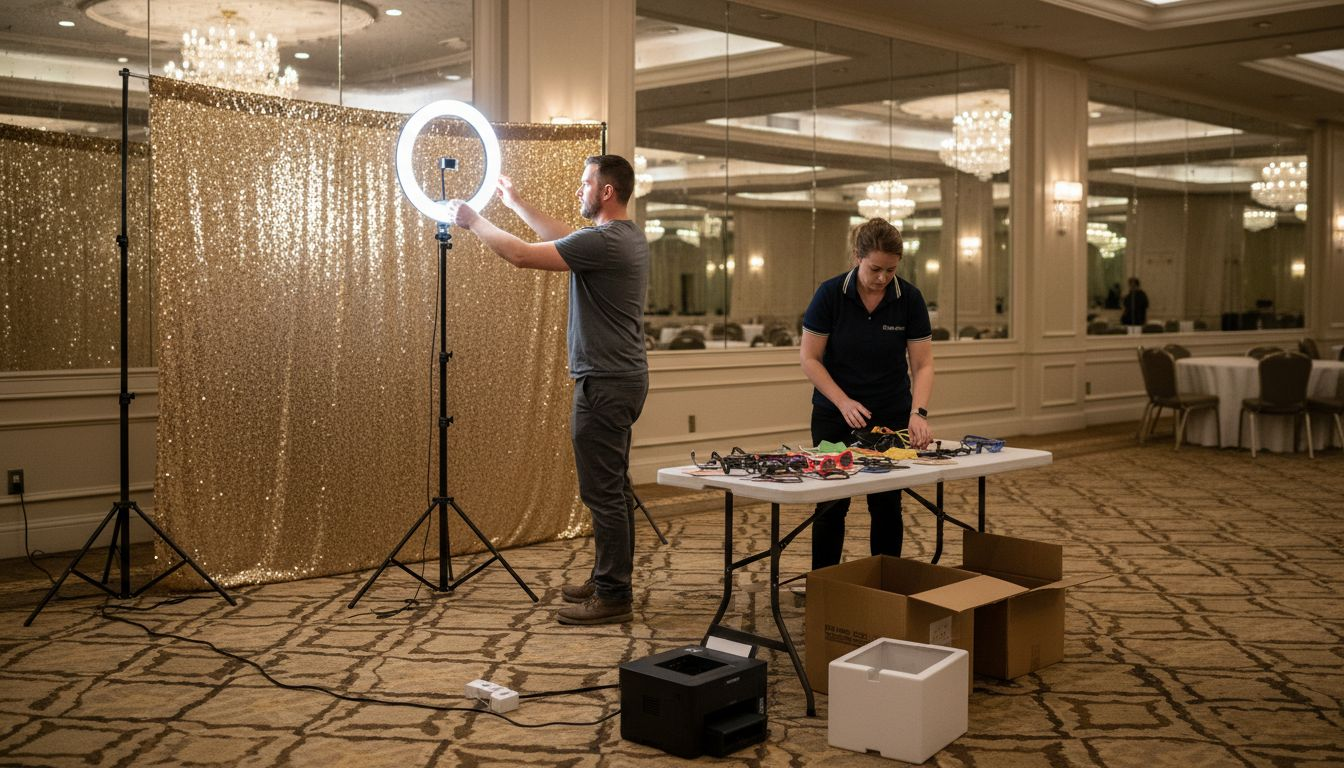
Step 3: Assemble and secure photo booth components
Transforming your carefully selected equipment into a fully functional photo booth requires precise assembly and strategic component placement. Your mission is to create a stable, professional setup that looks impressive and operates flawlessly throughout your event.
When assembling professional photo booth components, follow these critical mounting and structural guidelines:
- Frame Assembly: Construct a robust base using durable materials
- Height Calibration: Position components at comfortable guest interaction levels
- Cable Management: Organize and secure all electrical connections
- Equipment Mounting: Use quick-release clamps for secure yet flexible positioning
- Stability Checks: Ensure all connections are tight and wobble-free
A well-assembled photo booth is the foundation of an unforgettable guest experience.
Pay special attention to mounting your camera, tablet, and lighting equipment. Each component should be securely fastened using professional-grade mounting hardware that prevents movement during intense guest interactions. Quick-release mechanisms can help you adjust positioning quickly while maintaining rock-solid stability.
Pro tip: Create a numbered assembly diagram before the event and practice your setup at least twice to streamline the process and identify any potential issues.
Step 4: Configure software and customize experience
Turning your photo booth into a personalized, interactive experience requires thoughtful software configuration and creative customization. Your goal is to transform standard photo-taking into an engaging, memorable interaction that reflects the unique spirit of your event.
Modern photo booth software offers incredible customization potential with cutting-edge features that go far beyond simple image capture:
- Interface Design: Create touchscreen-friendly layouts
- Branding Options: Add custom logos and event-specific overlays
- AR Filters: Integrate fun augmented reality effects
- Social Sharing: Configure instant digital and social media sharing
- Template Customization: Design unique photo layouts and backgrounds
The right software transforms a photo booth from a simple camera into an interactive memory-making experience.
Pay special attention to selecting software that matches your specific event type and technical requirements. Consider factors like hardware compatibility, user interface intuitiveness, and the range of customization options available. Some advanced platforms offer multi-event management dashboards that can streamline your entire photo booth experience.
Pro tip: Always run a full test of your software configurations at least 24 hours before the event to identify and resolve any potential technical glitches.
Step 5: Test functionality and ensure guest readiness
Before your event kicks off, a comprehensive system test is crucial to guarantee a seamless photo booth experience. Your objective is to simulate guest interactions and identify potential technical hiccups before they can interrupt the fun.
Comprehensive photo booth testing involves multiple critical verification steps:
- Software Verification: Check event details and template configurations
- Hardware Functionality: Test cameras, printers, and physical components
- Connectivity Check: Confirm WiFi and network stability
- Backup Equipment: Prepare alternate cables and backup devices
- User Interface Test: Simulate complete guest interaction workflow
A thorough pre-event test is your insurance policy against potential technical disruptions.
Pay special attention to simulating guest experiences by running multiple test sequences. This means triggering photo captures, checking print quality, verifying social sharing functions, and ensuring every interactive element responds smoothly. Remember that a five-minute test can prevent hours of potential frustration during your actual event.
Pro tip: Create a detailed pre-event testing checklist and assign a specific team member to conduct a full system walkthrough at least two hours before guest arrival.
Elevate Your Event with Expert Photo Booth Solutions
Planning the perfect event photo booth setup can feel overwhelming with so many details to consider from floor plan design to equipment reliability and flawless software operation. If you want to avoid the common challenges of cramped spaces, poor lighting, or technical glitches you need a trusted partner who understands these critical factors and brings your vision to life. At RMD Photo Booths, we specialize in creating seamless and memorable photo booth experiences that keep your guests engaged and your event running smoothly.
Why choose RMD Photo Booths for your next event? Our extensive experience and diverse offerings — including traditional, 360°, and AI-powered booths — ensure your setup will have the perfect combination of cutting-edge technology, stylish design, and user-friendly operation. We handle the logistical challenges of setup and testing so you can focus on celebrating.

Ready to transform your event into an unforgettable gathering with professional photo booth services that match the detailed planning in the Ultimate Event Photo Booth Setup Guide for Events? Visit RMD Photo Booths today to explore our complete rental options and book now for flawless delivery in San Antonio. Don’t settle for less when your event deserves the best. Contact us to start your journey toward capturing lasting memories.
Frequently Asked Questions
How do I choose the best location for my event photo booth?
Selecting the right location involves placing your photo booth near main event areas for easy access, ensuring sufficient space for guest movement, and checking for good lighting. Start by marking potential spots with painter’s tape before making a final decision, allowing for an optimal guest experience.
What essential equipment do I need for a professional photo booth setup?
You need a high-resolution camera, a professional-grade printer, a user-friendly computer or tablet, effective lighting, and a versatile backdrop. Assemble these components early and test each one to ensure reliable functionality during your event.
How can I customize the software for my photo booth?
Customize your photo booth software by adding branding options, creating an easy-to-use interface, and integrating fun features like AR filters and social sharing. Plan to configure your software at least 24 hours before the event to ensure a personalized guest experience.
What space should I allocate for my event photo booth based on guest count?
Typically, allocate 8-10 square feet for the booth itself and an additional 20-30 square feet for guest queuing and movement. For example, if you expect 100 guests, plan for around 40 square feet total to provide a comfortable experience and avoid bottlenecks.
How do I test the functionality of my photo booth before an event?
Conduct a thorough testing process that includes checking hardware functionality, verifying software settings, and simulating guest interactions. Aim to complete this comprehensive check at least two hours before guests arrive to run through every possible scenario and address any issues.
