
TL;DR:
- A seamless photo booth setup involves thorough planning, logistics, and technology testing to prevent delays. Starting preparations 60 to 90 days in advance helps avoid costly errors and ensures smooth installation. Proper organization and design focus on guest flow and crew efficiency, creating memorable event experiences.
A truly smooth photo booth setup is defined as the end-to-end process of preparing, assembling, and staging a booth so it operates without delays, confusion, or last-minute surprises. Most event planners focus on how a booth looks. The ones who create genuinely memorable experiences focus on how it runs. A standard 10×10 booth requires 4–6 hours for complete installation. Larger 20×20 builds can take 2–3 days when union labor is involved. That time window is where events are won or lost, and understanding what fills it is the first step toward getting it right.
What is seamless booth setup and why does it matter?
A well-executed booth setup eliminates operational friction by managing every logistical detail upfront rather than reacting to problems on the day. That distinction matters more than most planners realize. A booth that looks polished but arrives late, has missing parts, or confuses the labor crew will still cost you time, money, and guest goodwill.
The industry term for this approach is “turnkey booth management.” It covers everything from freight coordination and venue compliance to on-site assembly, technology testing, and final staging. When all those pieces connect without gaps, guests walk into a photo booth experience that feels effortless. That feeling does not happen by accident. It is the result of deliberate planning that starts weeks before the event date.
For photo booth experiences specifically, the stakes are personal. Guests are there to create memories they will treasure. A booth that goes down mid-event or takes 45 minutes longer to set up than expected chips away at that experience before it even begins.
What are the essential components of a smooth photo booth setup?
A well-organized setup process breaks into six clear areas. Each one has to work before the next one can succeed.
- Pre-show planning and venue compliance. Submit your Certificate of Insurance and any required venue forms at least 30 days before the event. Missing this window creates administrative holds that delay freight and labor access.
- Freight and drayage management. Shipping to an advance warehouse rather than direct-to-show gives you a buffer. If a crate arrives damaged or a part is missing, you have time to fix it before setup day.
- Modular booth framework. Tool-less assembly systems reduce setup time and lower the risk of errors when crew members are unfamiliar with the booth design. Modular panels also make reconfiguration fast if the venue layout shifts.
- Digital install maps with QR codes. A physical or digital install map attached to each crate tells any crew member exactly where every component goes. This one step prevents the most common source of setup delays.
- AV, lighting, and technology testing. Understanding AV equipment basics before setup day means your team can troubleshoot on the spot rather than waiting for a technician. Test every screen, printer, and lighting rig before guests arrive.
- Final walkthrough and brand check. Walk the booth as a guest would. Check sightlines, prop placement, backdrop alignment, and print output quality. This is your last chance to catch anything off before the doors open.
Pro Tip: Label every crate and component with both a number and a color code. Color coding works faster than reading labels when a crew is moving quickly under time pressure.
How does booth design contribute to a smooth setup and guest engagement?
Booth design is not just about looking good. It is about guiding people through a space in a way that feels natural and keeps traffic moving. Strategic booth layout prioritizes storytelling flow over equal product spacing, placing high-engagement items at entry points to direct visitor behavior from the moment they arrive.

For photo booths, this means positioning your backdrop and camera station so they are visible from the booth entrance. Props and print stations should sit to the side or rear, pulling guests deeper into the space rather than crowding the entry. Clear walkways and open entry points encourage foot traffic and keep the booth accessible throughout the event.
Vertical space is one of the most underused tools in booth design. Tall backdrops, branded overhead signage, and elevated lighting rigs draw the eye upward and make a compact footprint feel larger. Using furniture and strategic zoning rather than walls creates open, approachable spaces that feel organized yet inviting.
Layout shapes matter too. An L-shape or U-shape configuration naturally defines zones for different activities, such as posing, printing, and prop selection, without requiring physical barriers. This keeps the experience flowing and prevents bottlenecks during peak event moments.
Pro Tip: Place your most visually striking element, whether a neon sign, a branded backdrop, or a 360° rig, at the exact spot where guests first see the booth. First impressions set the tone for how long people stay and how many photos they take.
What common mistakes undermine a well-planned booth setup?
Most setup failures trace back to a small set of avoidable errors. Knowing them in advance is the fastest way to protect your event.
- Late freight arrivals. When your booth materials arrive after the labor crew, idle labor costs can exceed $200 per hour. That expense adds up fast and comes directly out of your event budget.
- Skipping the warehouse pre-build. A full pre-build rehearsal in a warehouse environment catches missing parts and misalignments before setup day. Finding a problem onsite costs far more in time and money than finding it a week earlier.
- Poor labor scheduling. Booking crew without a buffer window is a gamble. Build at least two hours of flex time into your setup schedule to absorb delays without pushing into event start time.
- No install documentation. A crew that has never seen your booth before cannot set it up efficiently without a guide. Missing this step is one of the most common causes of setup confusion and rework.
- Blocking the booth entry. Placing a table, display stand, or prop cart directly in front of the booth entrance discourages guests from stepping in. Keep the entry open and inviting at all times.
- Ignoring inventory flow during the event. Props get moved, prints run low, and backdrops shift. Plan for a crew member or point of contact to do a quick booth check every 30–45 minutes to keep everything looking sharp.
Pro Tip: Create a one-page setup checklist and assign each item to a specific person by name. Shared responsibility with no clear owner is the same as no responsibility at all.
How to plan and execute a booth setup timeline for events
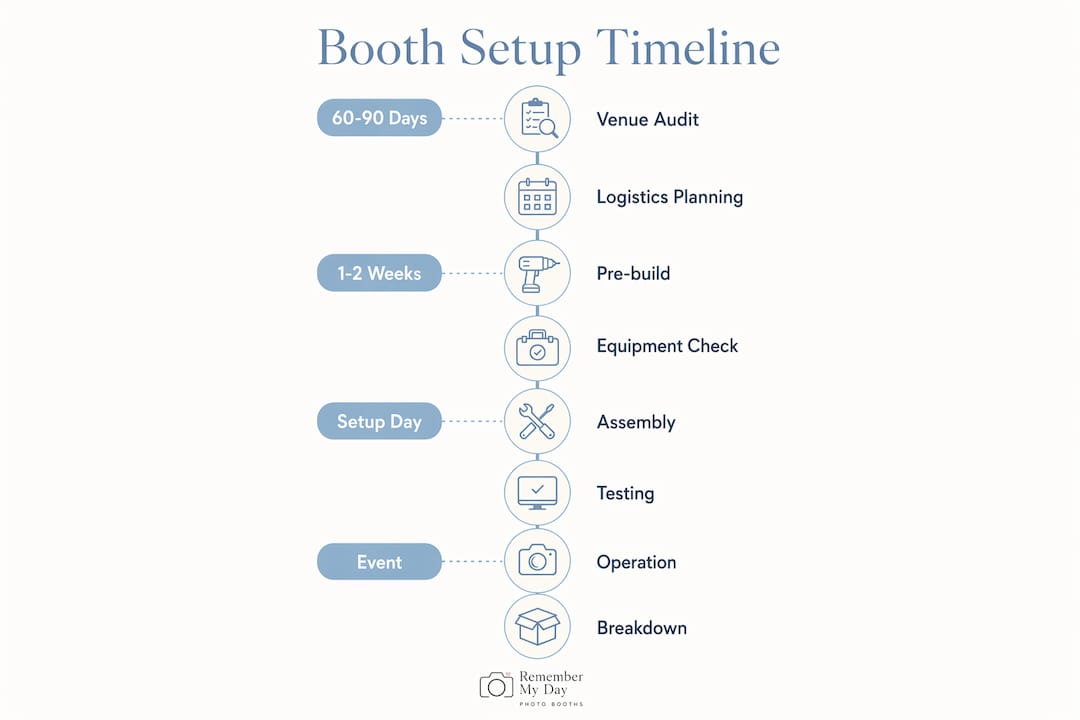
A reliable setup planning process starts 60–90 days before the event, not the week before. Early planning gives you time to resolve venue conflicts, secure permits, and test your full booth system before anything is at stake.
The table below outlines a practical timeline framework for event planners managing photo booth setups.
| Timeframe | Action |
|---|---|
| 60–90 days before | Audit venue rules, union requirements, and freight logistics; confirm booth dimensions and power needs |
| 30 days before | Submit COI, venue permits, and any required compliance forms; book advance warehouse shipping |
| 2–3 weeks before | Conduct full warehouse pre-build; test all AV, lighting, and print systems; create digital install map |
| 1 week before | Distribute install guides to crew; confirm labor schedule and contact list; pack and label all crates |
| Day of setup | Arrive with a 2-hour buffer before event start; complete final walkthrough and brand check |
| Post-event | Document teardown process; note any issues for future events; confirm freight pickup schedule |
Turnkey and modular rental solutions offload union labor, rigging, and venue compliance complexities, allowing planners to focus on guest engagement rather than logistics. For planners who do not want to manage every step in-house, this is the most reliable path to a smooth event. You can also explore a detailed photo booth setup process to see how professional operators structure each phase from delivery to teardown.
Our take on what actually makes a booth setup work
We have set up photo booths at weddings, corporate galas, private parties, and large public celebrations across San Antonio. After more than 1,000 five-star events, we can tell you with confidence: the setups that go wrong almost always skip the rehearsal.
Planners often treat the warehouse pre-build as optional, something to do if time allows. We treat it as non-negotiable. Every time we have skipped it under deadline pressure, we have paid for it onsite. A missing mounting bracket or a misaligned backdrop panel that takes five minutes to fix in a warehouse takes 45 minutes to fix when guests are arriving.
The other thing we have learned is that design and logistics are not separate conversations. The way you lay out a booth affects how fast it sets up, how guests move through it, and how easy it is to maintain during the event. A beautiful booth that creates a traffic jam at the entry is not a success. We design our booth experiences with both guest flow and crew efficiency in mind from the very first sketch.
If you are planning your first large-scale photo booth event, start with the timeline. Work backward from your event start time and build in more buffer than you think you need. The planners who look calm on event day are the ones who did the hard work 60 days earlier.
— RMD
Rmdphotobooths makes your event setup worry-free
Planning a photo booth experience should feel exciting, not stressful. At Rmdphotobooths, we handle every detail of the setup process so you can focus on your guests and your event.

Our team brings fully tested, ready-to-go booth systems to your venue, manages all on-site assembly, and stays through the event to keep everything running perfectly. From traditional photo booths to 360° rigs and AI-powered experiences, every option in our photo booth experiences catalog comes with professional logistics support built in. We have earned over 1,000 five-star reviews in San Antonio by treating every event as if it were our own. When you are ready to lock in your date, our booking page makes it fast and easy to get started.
FAQ
What is a seamless booth setup?
A smooth booth setup is the complete process of planning, assembling, and staging a photo booth so it operates without delays or disruptions. It covers logistics, design, labor coordination, and technology testing from start to finish.
How long does a standard photo booth take to set up?
A standard 10×10 booth typically requires 4–6 hours for full installation. Larger builds with complex AV or structural elements can take significantly longer, especially in venues with union labor requirements.
Why is a warehouse pre-build important?
A warehouse pre-build catches missing parts and structural misalignments before setup day, saving time and money. Finding a problem in a warehouse is far less costly than discovering it when your labor crew is already on the clock at the venue.
How far in advance should I plan a booth setup?
Start logistics and venue compliance planning 60–90 days before your event. Submit required permits and insurance certificates at least 30 days out to avoid administrative delays that can hold up freight and labor access.
What is the biggest mistake event planners make during booth setup?
The most common and costly mistake is allowing freight to arrive after the labor crew, which triggers idle labor charges of $200 or more per hour. Shipping to an advance warehouse and building buffer time into the schedule prevents this entirely.
Key takeaways
A well-executed photo booth setup requires end-to-end logistics management, starting 60–90 days out, to eliminate delays, control costs, and deliver a guest experience worth remembering.
| Point | Details |
|---|---|
| Start planning early | Begin logistics and venue compliance work 60–90 days before your event to avoid rush charges and permit delays. |
| Always pre-build in a warehouse | A full rehearsal build catches missing parts and misalignments before they become expensive onsite problems. |
| Use install maps for every setup | A digital or physical install map with QR codes speeds up labor and prevents costly crew confusion. |
| Design for guest flow, not just looks | Place high-engagement elements at entry points and keep walkways clear to guide visitors and prevent bottlenecks. |
| Build in a 2-hour setup buffer | Scheduling flex time before event start absorbs unexpected delays without pushing into guest arrival time. |