TL;DR:
- A wedding photo booth setup involves selecting a strategic location, building a sturdy backdrop, and testing hardware and software before guests arrive to ensure a seamless experience. Proper planning, including lighting, props, and positioning, creates engaging photo opportunities that guests will remember and revisit. Early testing and coordination with venue staff help avoid common issues and guarantee a smooth, memorable photo booth experience.
A step by step wedding photo booth setup transforms your reception into an interactive memory-making experience that guests will talk about long after the last dance. This guide walks you through every stage of a DIY wedding photo booth, from picking the perfect spot on the floor plan to running a full system test before your first guest arrives. You will learn how to choose a location, build a backdrop, position your camera and lighting, curate props, configure software, and troubleshoot problems on the fly. Whether you are a hands-on planner or simply want to understand what goes into a professional-feeling booth, this wedding photo booth guide covers it all.
What does a step by step wedding photo booth setup involve?
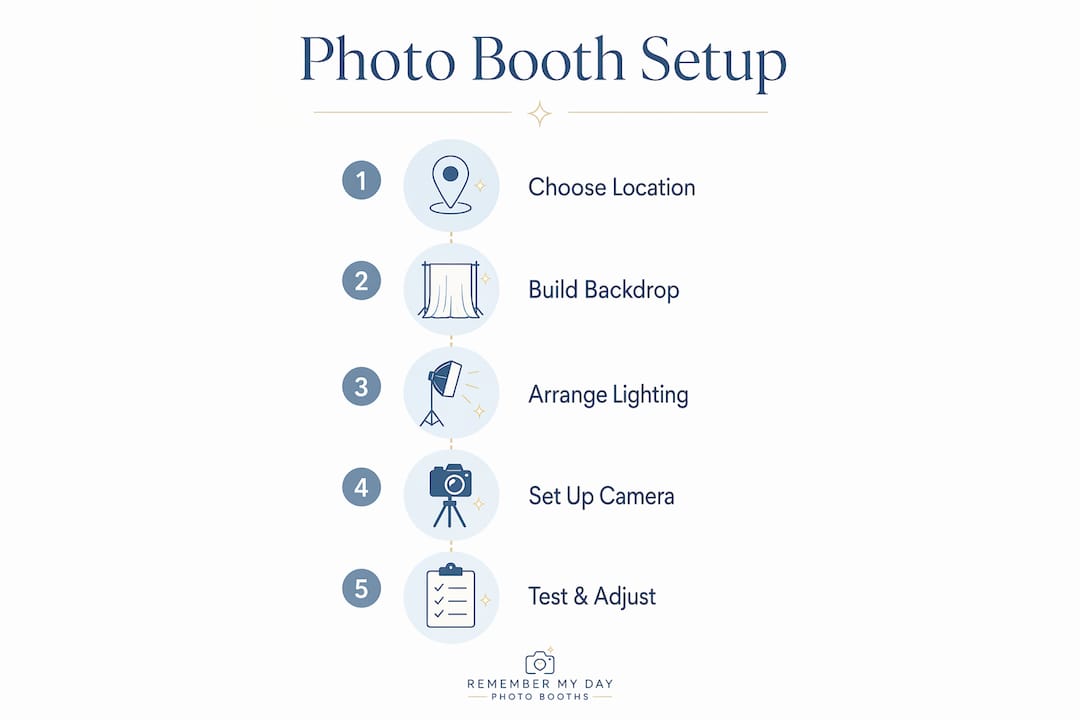
A wedding photo booth setup is the process of selecting a location, assembling a backdrop and frame, positioning camera and lighting equipment, arranging props, and testing the full system before guests arrive. The industry term for this process is “photo booth deployment,” and it covers both hardware configuration and software integration. Getting each stage right is what separates a booth that guests line up for all night from one that sits idle in the corner.
The setup process is more time-sensitive than most couples expect. Professional assembly takes 30 to 45 minutes, but industry guidance recommends 90 minutes for comprehensive hardware and software testing before guests arrive. That extra hour is where problems get caught and fixed, not discovered mid-reception.
The magic of a great photo booth comes from the seamless integration of camera, lighting, backdrop, and user-friendly software combined with creative personal touches. Think of these four elements as legs on a table. Remove one and the whole experience wobbles.
How to choose the right location and prepare the space
Location is the single decision that affects every other part of your setup. A well-placed booth gets used constantly. A poorly placed one becomes invisible.
Start by walking the venue with a measuring tape. You need a footprint of at least 8 feet wide by 6 feet deep to comfortably fit a backdrop, camera on a tripod, and a small group of guests. Mark that space on your floor plan before committing to it.
Here are the key criteria for an ideal photo booth location:
- Visibility without obstruction. Place the booth where guests naturally pass by, near the dance floor or bar, but not directly in the traffic lane.
- Clear of service paths. Experts warn against blocking servers, DJs, and primary exits, since bottlenecked pathways create safety hazards and frustrated staff.
- Access to power. Confirm there is an outlet within 10 feet for lighting and any printing equipment. Extension cords taped flat to the floor prevent trip hazards.
- Lighting conditions. Natural light from a nearby window works beautifully for daytime receptions. For evening events, plan entirely around your artificial lighting setup.
- Room for a small queue. Leave 4 to 5 feet of open space in front of the booth so two or three guests can wait without crowding the couple currently posing.
Pro Tip: Ask your venue coordinator for a scaled floor plan before your site visit. Sketch your booth footprint on it and share it with your DJ and caterer so everyone agrees on the space before setup day.
Coordinate placement with your DJ and event planner early. The booth should complement the entertainment flow, not compete with it. Placing it near the DJ booth, for example, means guests naturally drift over between songs, which keeps traffic moving all night.
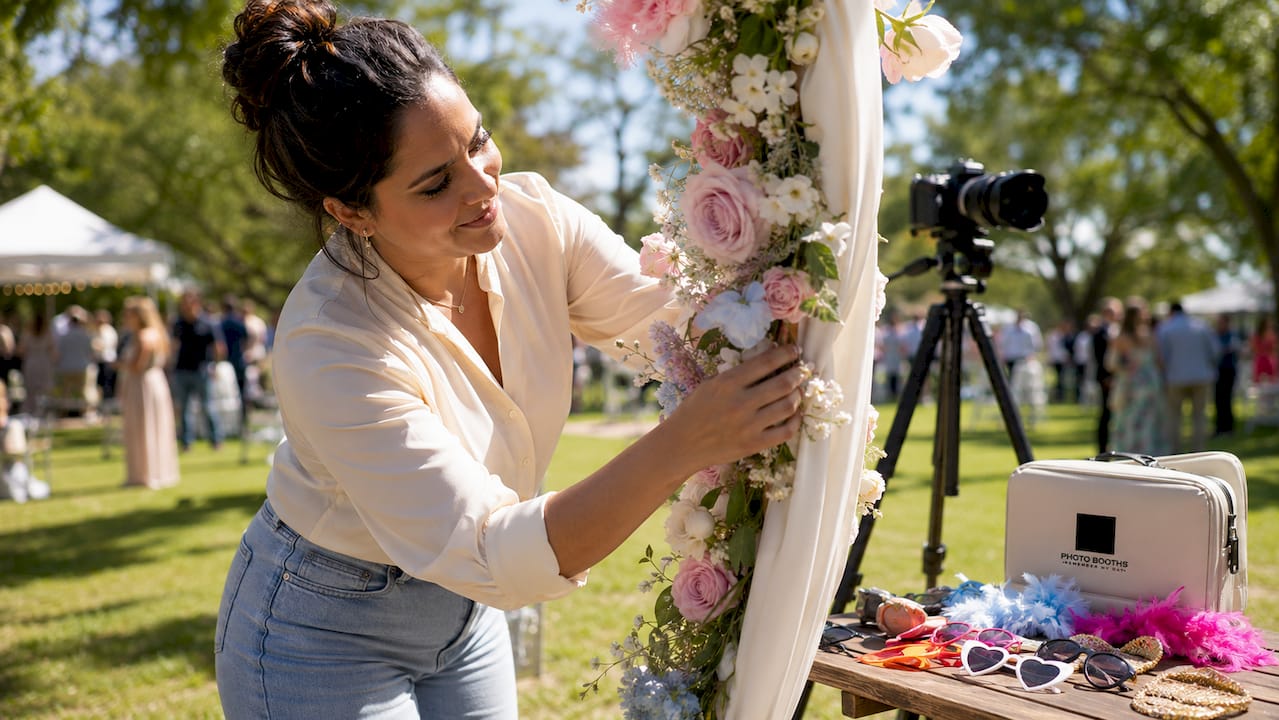
How do you build a backdrop that photographs beautifully?
The backdrop is the visual centerpiece of your photo booth. It sets the tone, reflects your wedding theme, and directly affects photo quality. Choosing the wrong material or building an unstable frame are the two most common DIY mistakes.
Here is a comparison of the most popular backdrop options:
| Backdrop type | Best for | Key advantage | Key drawback |
|---|---|---|---|
| Fabric drape (velvet or thick cotton) | Classic and formal weddings | Reduces glare and flash reflection | Requires heavy-duty clamps to stay taut |
| Pipe and drape system | Versatile, reusable setups | Professional look, adjustable width | Heavier to transport and assemble |
| Paper flower or petal wall | Romantic and garden-style weddings | Stunning visual impact | Fragile and time-consuming to build |
| Balloon arch | Fun and colorful celebrations | Affordable and festive | Can deflate or shift during long events |
| Sequin or metallic fabric | Glamorous and modern receptions | Reflects light beautifully | Can cause glare in photos if overlit |
Backdrops made from heavier, non-shiny fabrics like velvet or thick cotton blends reduce glare and camera flash problems, which directly improves photo quality. Pulling the fabric tight and securing it with heavy-duty clamps prevents wrinkles, one of the most common flaws in DIY booth photos.
For the frame itself, PVC pipe frames offer portability and ease for one-off events, while wood frames add durability for couples who plan to reuse the setup. A standard PVC frame uses 1.25-inch diameter pipe, four corner connectors, and two T-connectors for a crossbar at the top. The whole structure assembles in under 20 minutes with no tools.
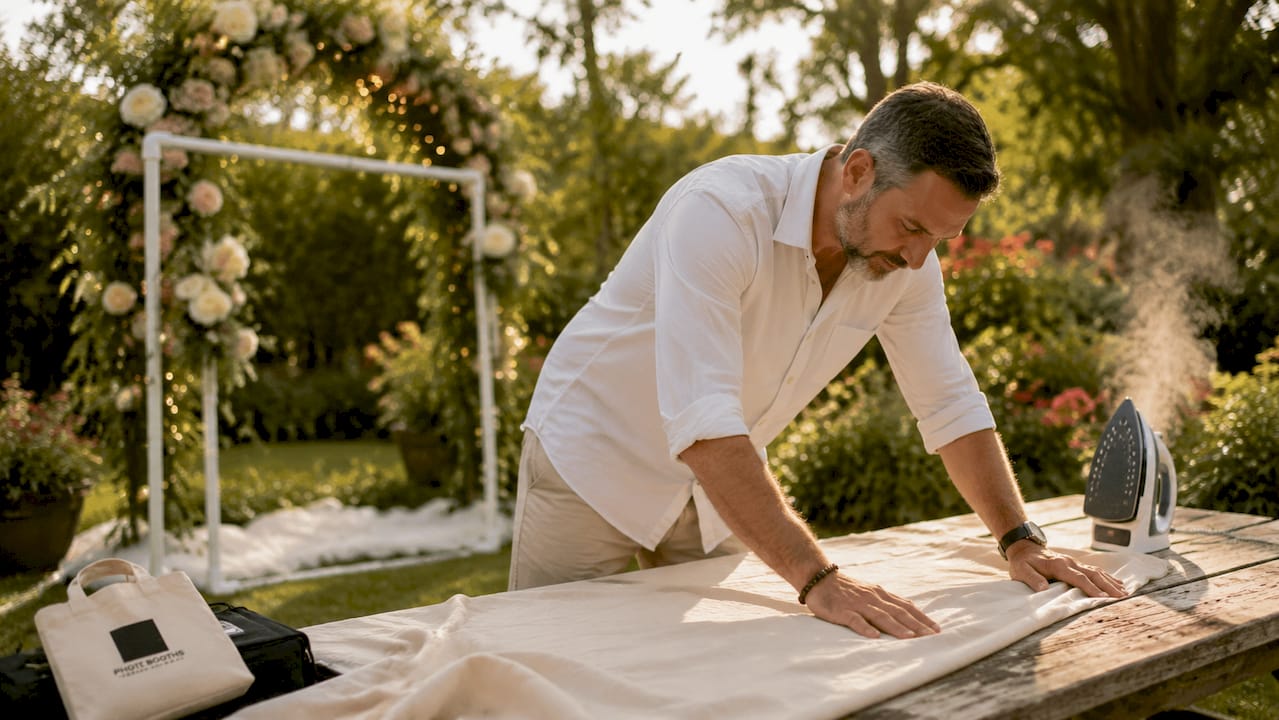
Pro Tip: Iron or steam your fabric backdrop the morning of the wedding, not the night before. Fabric relaxes and re-wrinkles overnight, especially in humid climates like San Antonio.
Add personal touches to make the backdrop feel intentional. String lights woven through a floral arch, a custom neon sign with your wedding date, or a framed chalkboard with your hashtag all give guests something to interact with beyond just posing.
What camera and lighting setup produces the best photos?
Camera and lighting choices determine whether your guests walk away with photos they treasure or ones they quietly delete. The good news is that you do not need a professional photography background to get this right.
For camera selection, consider these options:
- DSLR or mirrorless camera on a tripod. A DSLR paired with a remote shutter or timer gives you control over aperture and shutter speed, which is critical in tricky indoor lighting. Canon Rebel series and Sony Alpha entry-level models both perform well in this role.
- iPad or tablet with a wide-angle lens. This works well with photo booth software apps like Darkroom or Simple Booth HALO, which offer live previews and instant sharing. The image quality is lower than a DSLR, but the guest experience is more intuitive.
- Smartphone on a tripod. A modern iPhone 15 Pro or Samsung Galaxy S24 Ultra captures excellent images in well-lit conditions. Pair it with a Bluetooth shutter remote for hands-free operation.
Lighting is the factor that separates flattering photos from unflattering ones. Ring lights provide soft, even illumination that minimizes shadows under the eyes and chin, which is why they are the top recommendation for photo booths. Position the ring light at eye level, centered directly behind or around the camera lens.
For ambient warmth, add string lights or LED strip lights along the top of your backdrop frame. These fill in background shadows without overpowering the main light source. Keep all lighting at roughly the same color temperature (warm white at 3000K works well for most skin tones) to avoid color casts in your photos.
How do you set up props, software, and run a final test?
Props and software are where your booth goes from functional to genuinely fun. This is also where most DIY setups skip steps and pay for it during the reception.
Follow this sequence for the final stage of your setup:
- Curate your prop selection. A well-curated, themed prop selection encourages guest participation without creating clutter. Aim for 10 to 15 props maximum: a mix of signs with funny phrases, oversized glasses, hats, and one or two items that reference your wedding theme. Arrange them in a shallow basket or on a small table within arm’s reach of the camera.
- Install and configure your photo booth software. Programs like Darkroom Booth, dslrBooth, or Simple Booth HALO handle live previews, countdown timers, photo sessions, and digital sharing. Set your session to capture three to four shots in a strip format. Configure the digital overlay with your names and wedding date.
- Connect your printer if using one. DNP and HiTi dye-sublimation printers are the industry standard for event photo printing. Load your paper, run a test print, and confirm the color profile matches your screen preview.
- Test the full system end to end. Running full cycles confirms system integration and a smooth guest experience. Take five to ten sample photos, print two or three, and test the digital sharing function via email or QR code.
- Assign a booth attendant. Assigning a casual overseer helps maintain flow, resolve small issues, and gently encourage guest participation. This person does not need to be a tech expert. They just need to know how to restart the software and swap a prop basket.
Pro Tip: Create a one-page cheat sheet for your booth attendant covering how to restart the software, reload paper, and reset the camera. Laminate it and tape it to the back of the backdrop frame where guests cannot see it.
What are the most common photo booth problems and how do you fix them?
Even a well-planned setup runs into issues. Knowing what to expect means you can fix problems in under two minutes instead of losing 20 minutes of booth time.
- Poor lighting causing dark or shadowy photos. Move the ring light closer to the camera and raise it to eye level. If the room has strong overhead lighting, turn it off in the booth area and rely entirely on your dedicated light source.
- Wrinkled or sagging backdrop. Re-clamp the fabric and pull it tighter at the base. If the frame is shifting, add sandbags or water weights to the base of each leg.
- Software freezing or lagging. Close all background applications on your laptop or tablet before the event. Keep the device plugged in and disable automatic updates for the day.
- Printer jams or color issues. Always bring one extra roll of dye-sublimation paper and run a test print after every 30 to 40 prints to catch color drift early.
- Guest bottlenecks forming. Position your attendant at the front of the queue to manage group sizes. Limit sessions to one group at a time and set a soft time limit of 90 seconds per session.
“Investing extra setup time beyond assembly is vital to test software-hardware connectivity, print templates, and network sharing to avoid event day hiccups.” — Industry guidance on photo booth deployment
Keep a small emergency kit near the booth: extra batteries, a power strip, a lint roller for the backdrop, and a phone charger. These four items solve 80% of on-the-spot problems without any technical knowledge required. You can also explore our 2026 setup guide for additional troubleshooting frameworks.
Key takeaways
A successful wedding photo booth setup depends on locking in location, backdrop, lighting, and software testing well before the first guest arrives.
| Point | Details |
|---|---|
| Location comes first | Choose a spot near guest activity that avoids service paths, exits, and DJ equipment. |
| Fabric and frame quality matter | Use heavy, non-shiny fabric pulled tight with clamps to eliminate wrinkles and glare. |
| Ring lights are non-negotiable | Position a ring light at eye level behind the camera for soft, shadow-free photos. |
| Test everything end to end | Run full photo, print, and sharing cycles 90 minutes before guests arrive. |
| Assign a booth attendant | One dedicated person keeps flow moving, fixes small issues, and encourages participation. |
What we have learned from setting up hundreds of wedding photo booths
After working with couples across San Antonio and beyond, we have seen one pattern repeat itself more than any other: the couples who stress the least on their wedding day are the ones who tested their booth setup two days before the event, not two hours before.
Early testing reveals the problems you cannot anticipate. The software that worked perfectly at home may conflict with the venue’s Wi-Fi. The backdrop that looked taut in your garage may sag in a humid ballroom. The ring light that seemed bright enough in a small room may wash out against a sequin backdrop. None of these are catastrophic problems. But they all take time to fix, and time is the one thing you do not have on your wedding day.
We also believe strongly that small personal touches in props and backdrop create a welcoming atmosphere that draws guests in repeatedly. Guests tend to revisit the photo booth multiple times during an event, and the setups that keep them coming back are the ones that feel personal, not generic. A sign that says “Better together since 2019” or a prop basket themed around your honeymoon destination tells guests that someone thought about them, and that feeling is what makes your booth a highlight of the night.
Coordinate with your DJ early. The best booth placements we have seen are always the result of a conversation between the couple, the DJ, and the venue coordinator before setup day. When everyone agrees on the space, the setup goes faster and the guest experience is smoother.
— RMD
Ready to make your wedding photo booth unforgettable?
If you love the idea of a photo booth but want the “wow” moments without the DIY stress, Rmdphotobooths has you covered. We bring over 1,000 five-star reviews and a full lineup of experiences to weddings across San Antonio, from classic traditional photo booths to 360° booths, glam booths, and AI-powered watercolor portraits. Every setup is handled by our team, tested before your guests arrive, and designed to spark joy all night long.

Browse our full range of photo booth experiences to find the perfect fit for your wedding style and guest count. When you are ready to make it official, book your date online in minutes and let us handle every detail from delivery to teardown.
FAQ
How long does a wedding photo booth take to set up?
Professional photo booth assembly takes 30 to 45 minutes, but industry guidance recommends arriving 90 minutes before guests to complete full hardware and software testing. That extra time is where problems get caught and fixed before they affect your reception.
What is the best camera for a DIY wedding photo booth?
A DSLR or mirrorless camera on a tripod paired with a remote shutter is the top choice for image quality and guest-friendly operation. Entry-level Canon Rebel or Sony Alpha models handle most indoor lighting conditions well.
How do I stop my backdrop from wrinkling during the event?
Use heavy, non-shiny fabrics like velvet or thick cotton and secure them with heavy-duty clamps pulled tight at the base. Steam or iron the fabric the morning of the event, not the night before.
What photo booth software works best for weddings?
Programs like dslrBooth, Darkroom Booth, and Simple Booth HALO are widely used for weddings because they support live previews, countdown timers, custom overlays, and digital sharing via QR code or email. You can explore more about configuring your booth software for weddings specifically.
Do I need a dedicated attendant for my wedding photo booth?
Yes. Assigning one person to oversee the booth keeps guest flow moving, prevents software issues from going unnoticed, and encourages shy guests to participate. They do not need technical expertise, just a laminated cheat sheet and a friendly attitude.
